
Boxymi Product Guide
Understand the records, workflows, and applications that keep inventory connected across Boxymi.
Concepts
Start with the building blocks of the inventory model: what you track, where it lives, and how related records stay organized.
Items
An item is anything you want to identify and track, such as a product, tool, supply, spare part, or piece of equipment.
Key details
- Identify it with a name, SKU, barcode, or QR code.
- Track its quantity and the locations where it is stored.
- Organize it with a category, tags, an image, and other useful details.
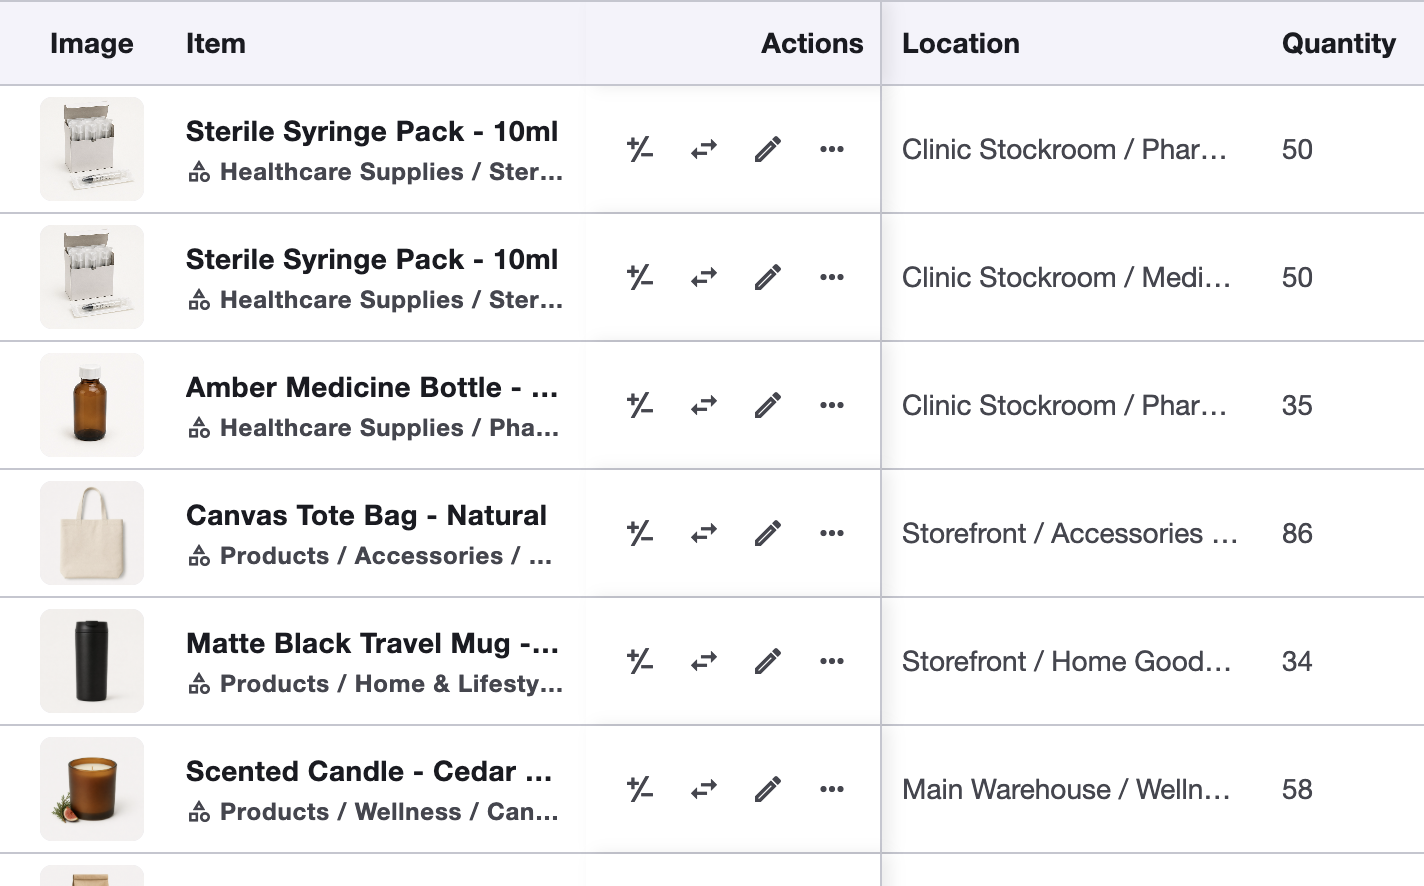
Important to know. The item describes what you track, while its inventory records show how much is available at each location.
Note. Keep identifiers and organizational details current so the item remains easy to find and distinguish.
Locations
A location is any physical or operational place where inventory is stored or used, such as a warehouse, room, shelf, vehicle, office, or job site.
Key details
- Arrange locations in a practical hierarchy, such as a warehouse containing zones and shelves.
- Use root locations for the main places your team manages.
- Add child locations for zones, shelves, or other useful detail.
- Connect quantities to the exact location where each item is held.
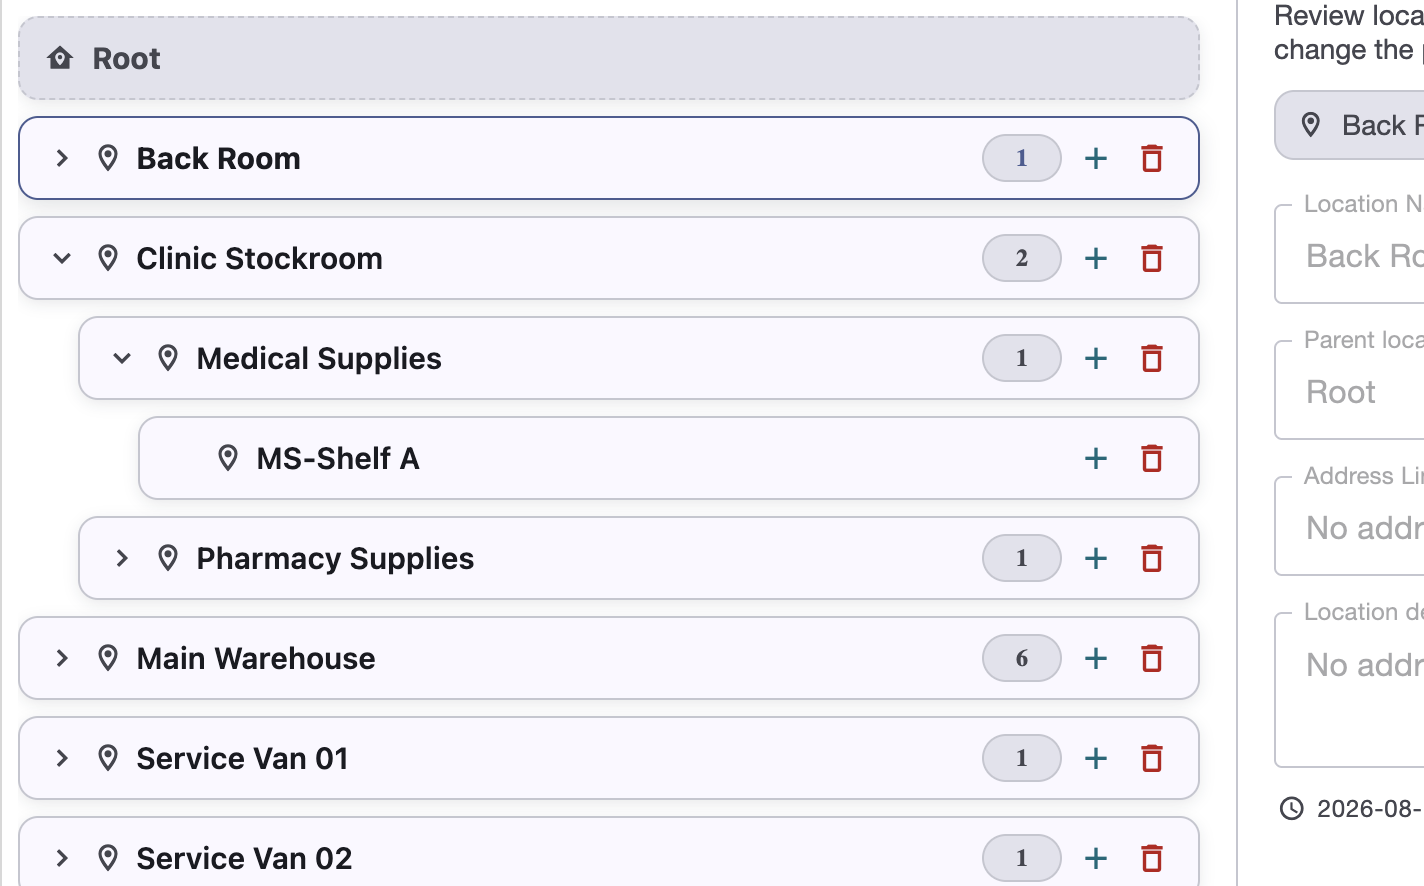
Important to know. Item quantities remain connected to their exact location, including child locations within a larger site.
Note. Start with the locations your team already uses and add more levels only when they improve accuracy.
Categories
Categories describe what kind of item something is and make large inventories easier to organize.
Categories support browsing, filtering, reporting, and imports, and an item can be assigned to a category when it is created, edited, or imported.
Important to know. Categories answer “What is it?”, while locations answer “Where is it?”
Note. Create broad categories at the top level and add subcategories only when they provide a useful distinction.
Tags
Tags are flexible workspace labels that add useful context to items across different categories.
An item can have multiple tags, such as Fragile, Rental, Inspection due, or Seasonal.
Important to know. Removing a tag from one item keeps it available elsewhere, while deleting it in Settings removes it from the workspace.
How it works
Add a short, unique tag in Settings → Tags for the workspace to reuse.
Select one or more tags while creating or editing an item on web or mobile.
Deselect the tag and save when that label no longer applies.
Search tags in Settings and delete only those no longer needed in the workspace.
Note. Categories define an item's structured type, while tags add flexible context across categories.
Bundles
A bundle is a finished item made from defined quantities of other inventory items, with a component list that acts like a simple recipe.
Key details
- Choose the working location and build quantity.
- Check that the required components are available there.
- Build by removing component quantities and adding the finished bundle quantity.
- Retain the resulting inventory movement in history.
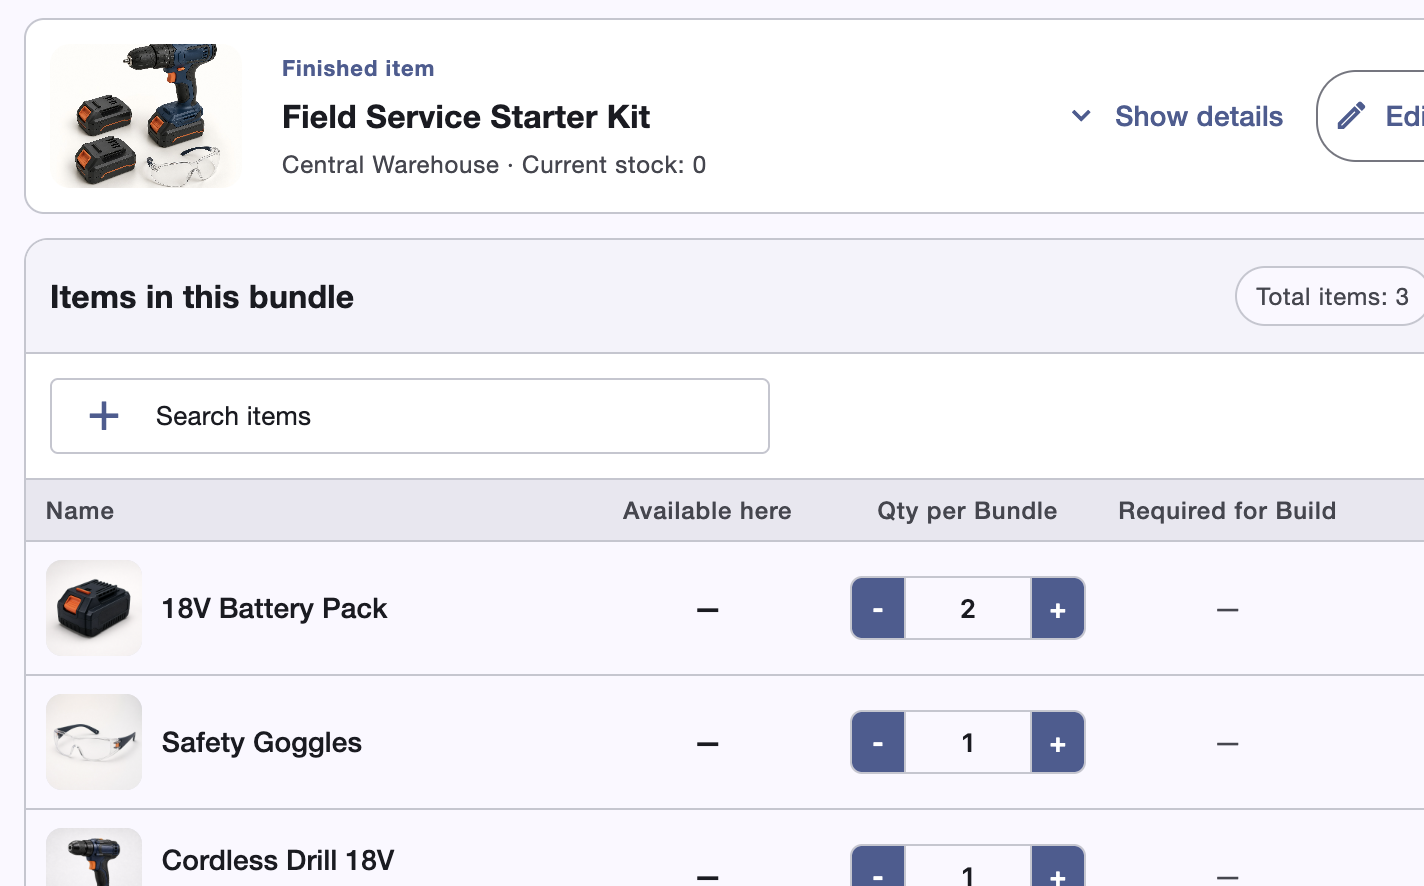
Important to know. A bundle is an inventory assembly, not a container.
Note. Review the chosen location, build quantity, and component availability before completing a build.
Variants
Variants are different versions of the same product, such as a shirt in several sizes or a component in different materials.
Key details
- Group related versions as one product family.
- Identify each variant with its own SKU, barcode, or QR code.
- Track each variant's quantity and location separately.
- Maintain each variant's image, price, and other item details.
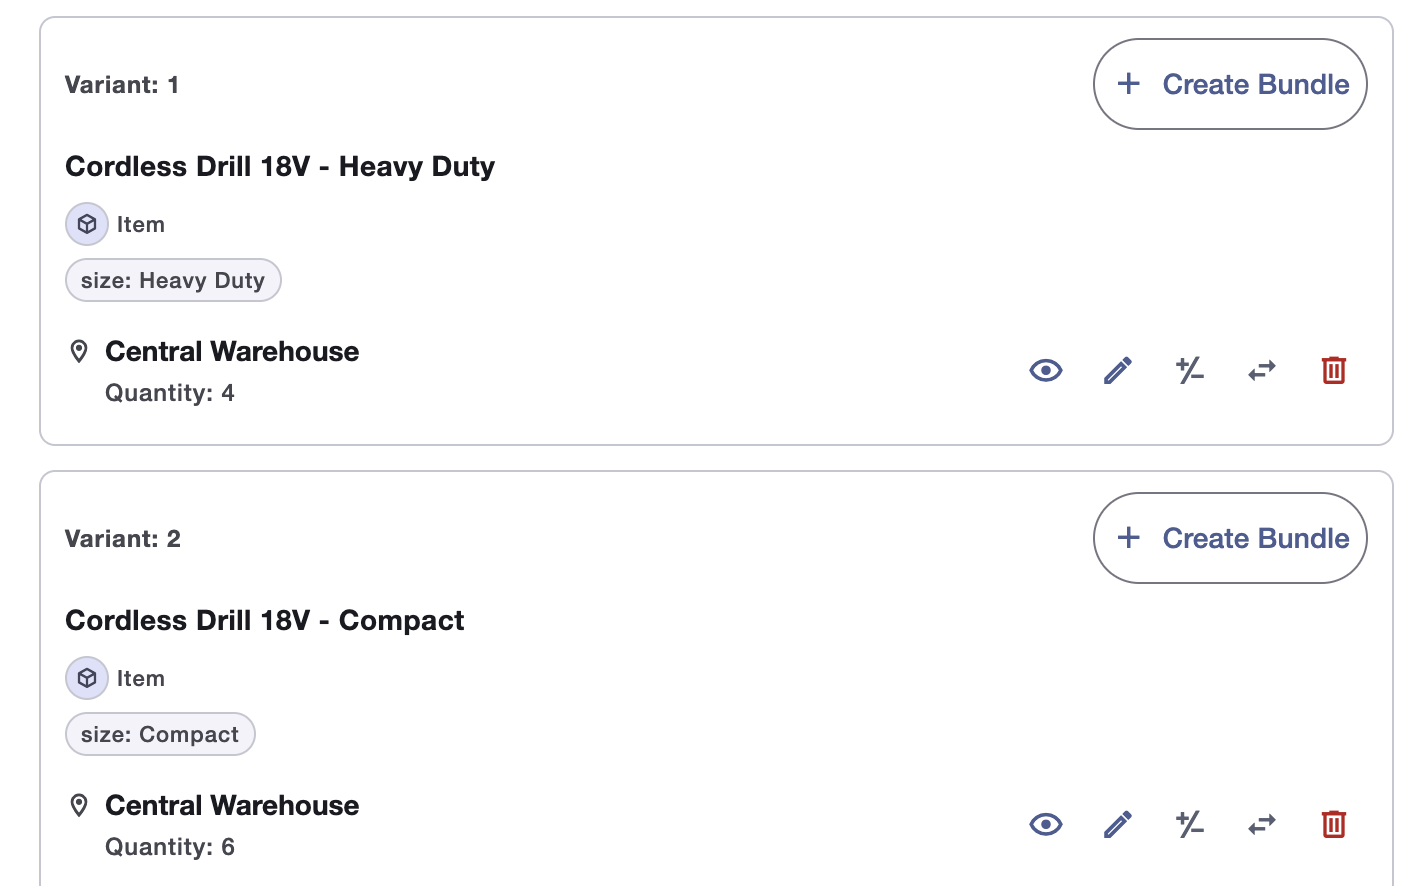
Important to know. Each variant remains an individual item with its own identity and inventory.
Note. Use variants only when the items belong to the same product family; keep unrelated products separate.
Partners: Clients and Suppliers
Partners are the external organizations involved in your purchasing and sales.
Keeping contact, legal, and reference details in one place avoids entering the same information on every order.
Important to know. Orders preserve the partner details used at the time, so later partner updates do not rewrite the historical order record.
Key aspects
Connect suppliers to purchase orders and item-sourcing information.
Connect clients to sales orders, delivery details, and client references.
Note. Keep current partner details complete so new orders can reuse them without repeated entry.
Key Features
Follow the operational workflows that change stock, verify quantities, fulfill orders, and surface work that needs attention.
Transactions
Transactions provide a read-only activity log of inventory movement and important item changes.
Key details
- Search by item, location, user, status, or reference.
- Filter by date, location, type, status, item, or user.
- Review quantities, source and destination locations, and status.
- Open the source record when more detail is needed.
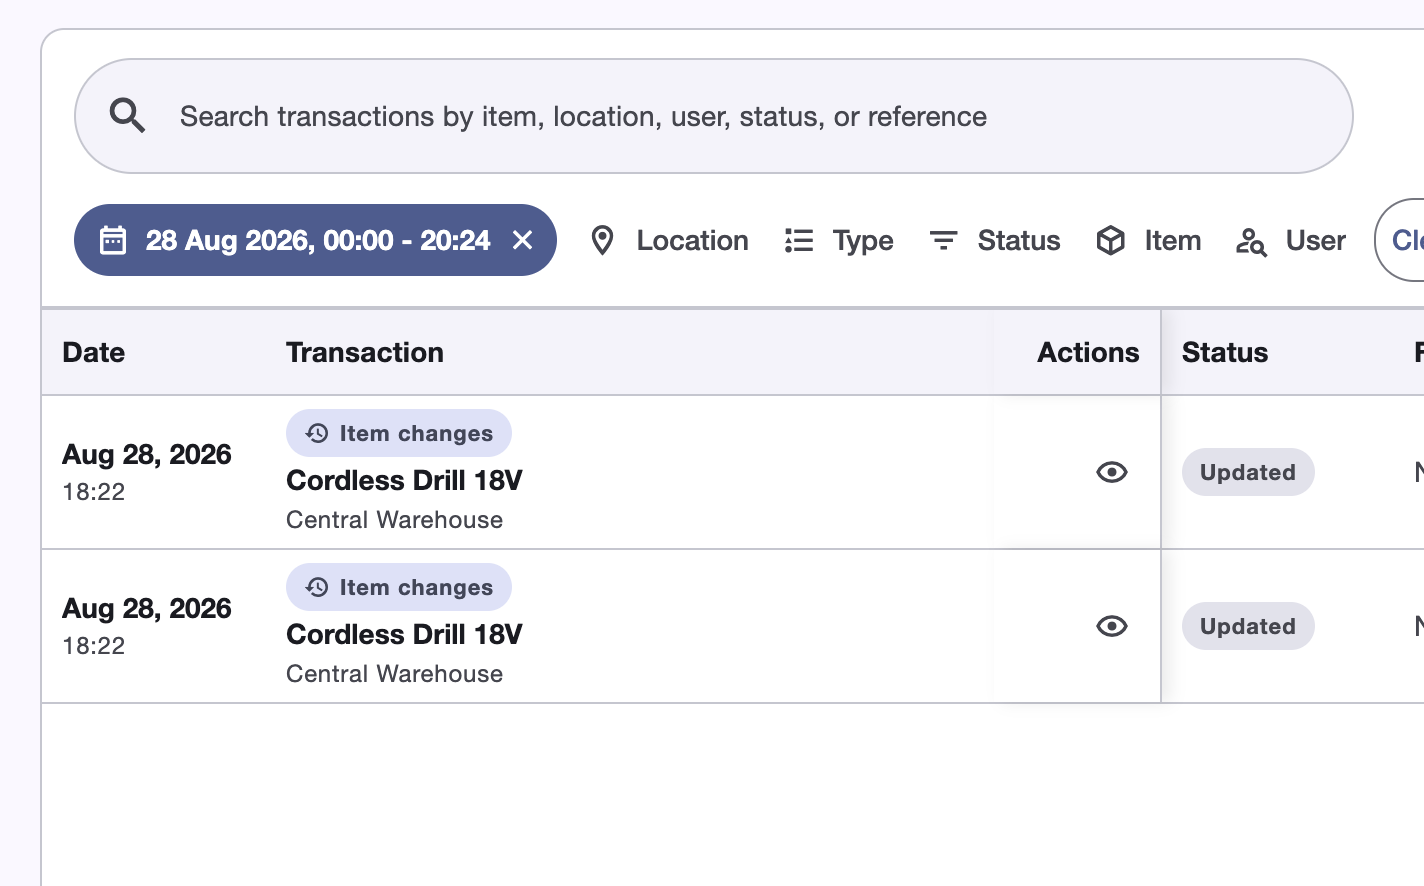
Important to know. The log explains what changed, where it happened, and who performed the action, but it does not change stock itself.
Note. Start an adjustment or transfer when inventory needs to be updated.
Adjustments
An adjustment corrects the quantity of an item at its current location after a shelf check, damage, loss, or another discrepancy.
Key details
- Add one or more items to the adjustment.
- Enter the quantity change or final counted quantity.
- Select a reason and add a short note when useful.
- Review the before, change, and after values before submitting.
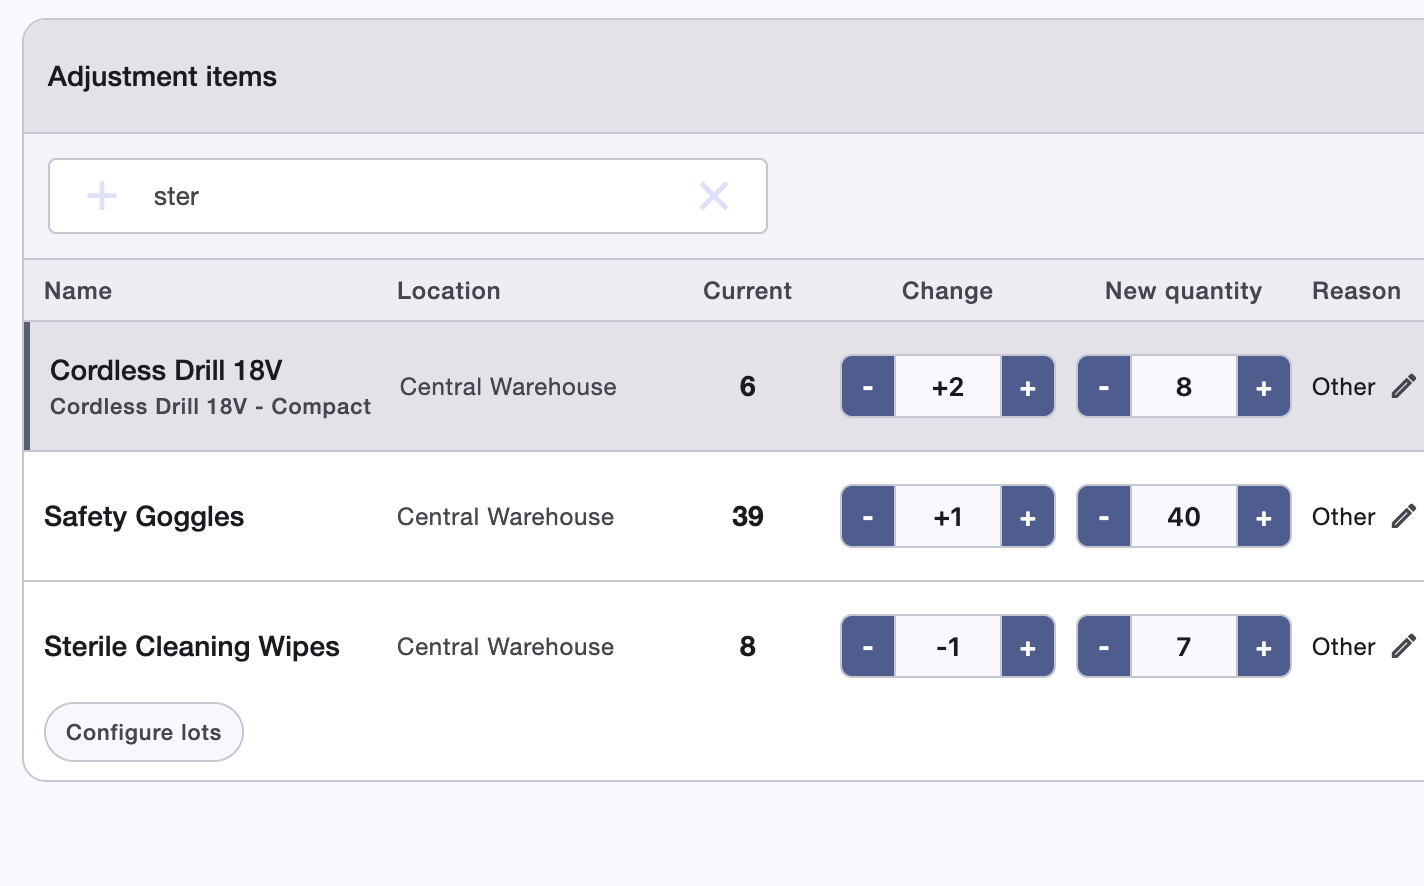
Important to know. Use an adjustment to correct quantity at the current location and a transfer when stock is physically moving elsewhere.
Note. Add a clear reason or short note when it will help explain the correction later.
Transfers
A transfer moves inventory from one location to another while preserving a clear movement history.
Key details
- Choose different source and destination locations.
- Add the items and quantities being moved.
- Set an optional assignee, transit schedule, reason, or note.
- Create, review, and ship the transfer, then confirm the quantities received at the destination.
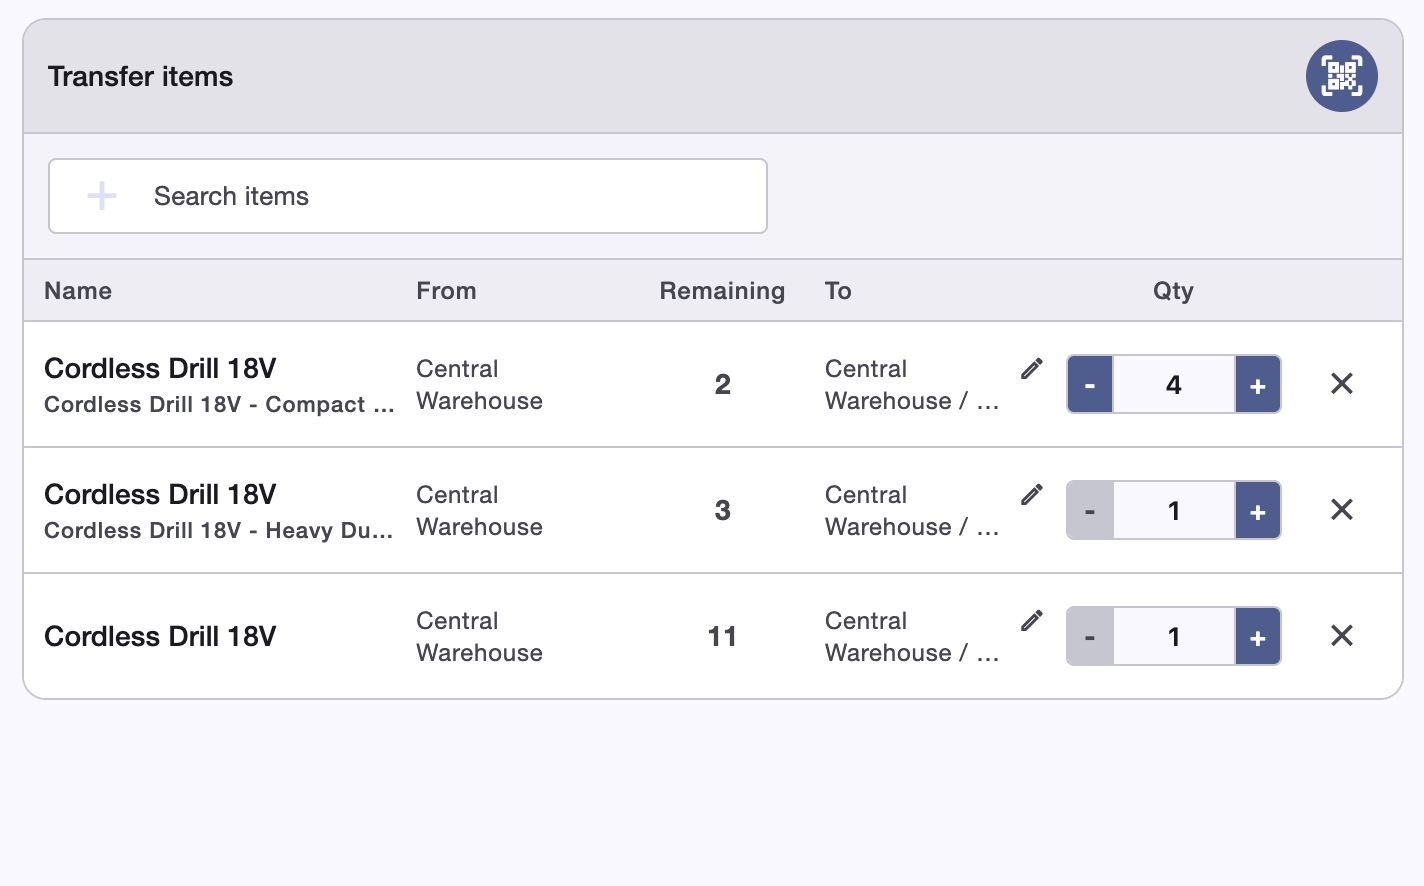
Important to know. Shipping removes the moved quantity from the source, while receiving confirms the quantity added at the destination.
Lifecycle
Review locations, items, quantities, assignment, and notes before shipping.
The shipped quantity has left the source and awaits receipt.
Confirm full or partial receipt to update the destination correctly.
Close a transfer that should not continue while preserving its history.
Note. Transfer history stays visible in Transactions, where you can open the source record for complete lifecycle and audit details.
Cycle Counts
A cycle count verifies selected stock without stopping operations for a complete physical inventory.
Key details
- Choose one or more locations or selected items.
- Assign the count and decide whether expected quantities are visible.
- Record each physical quantity and add a note when useful.
- Review differences before approving and applying the result.
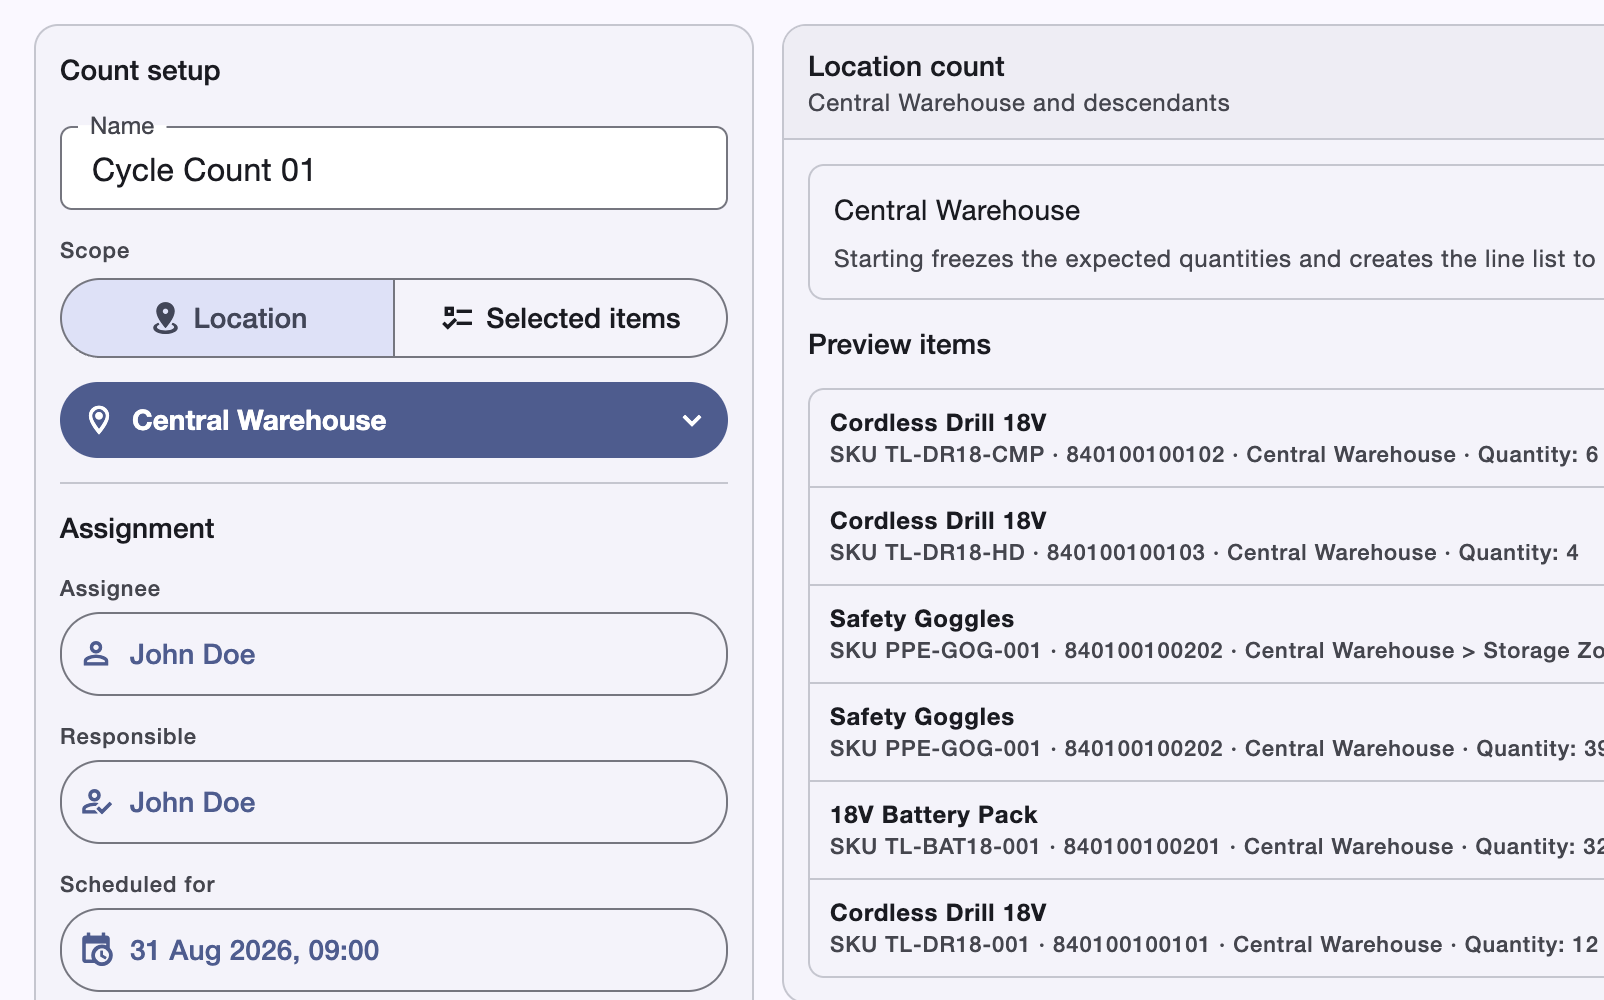
Important to know. Only applying an approved difference changes stock; a matching count closes the check without changing the recorded quantity.
Lifecycle
Define the scope, responsible person, and expected-quantity visibility.
Record what is physically present for every line in the plan.
Check unchanged lines, positive and negative differences, and notes.
Approve the count so verified differences update inventory.
Note. Assigned team members can perform and submit counts from the mobile app.
Purchase Orders
A purchase order tracks what you expect to receive from a supplier and where it should enter inventory.
Key details
- Select the supplier, currency, and default destination.
- Add item quantities, unit prices, and line destinations.
- Submit the order for approval, then mark it as ordered.
- Post receipts in full or in part with accepted and rejected quantities.
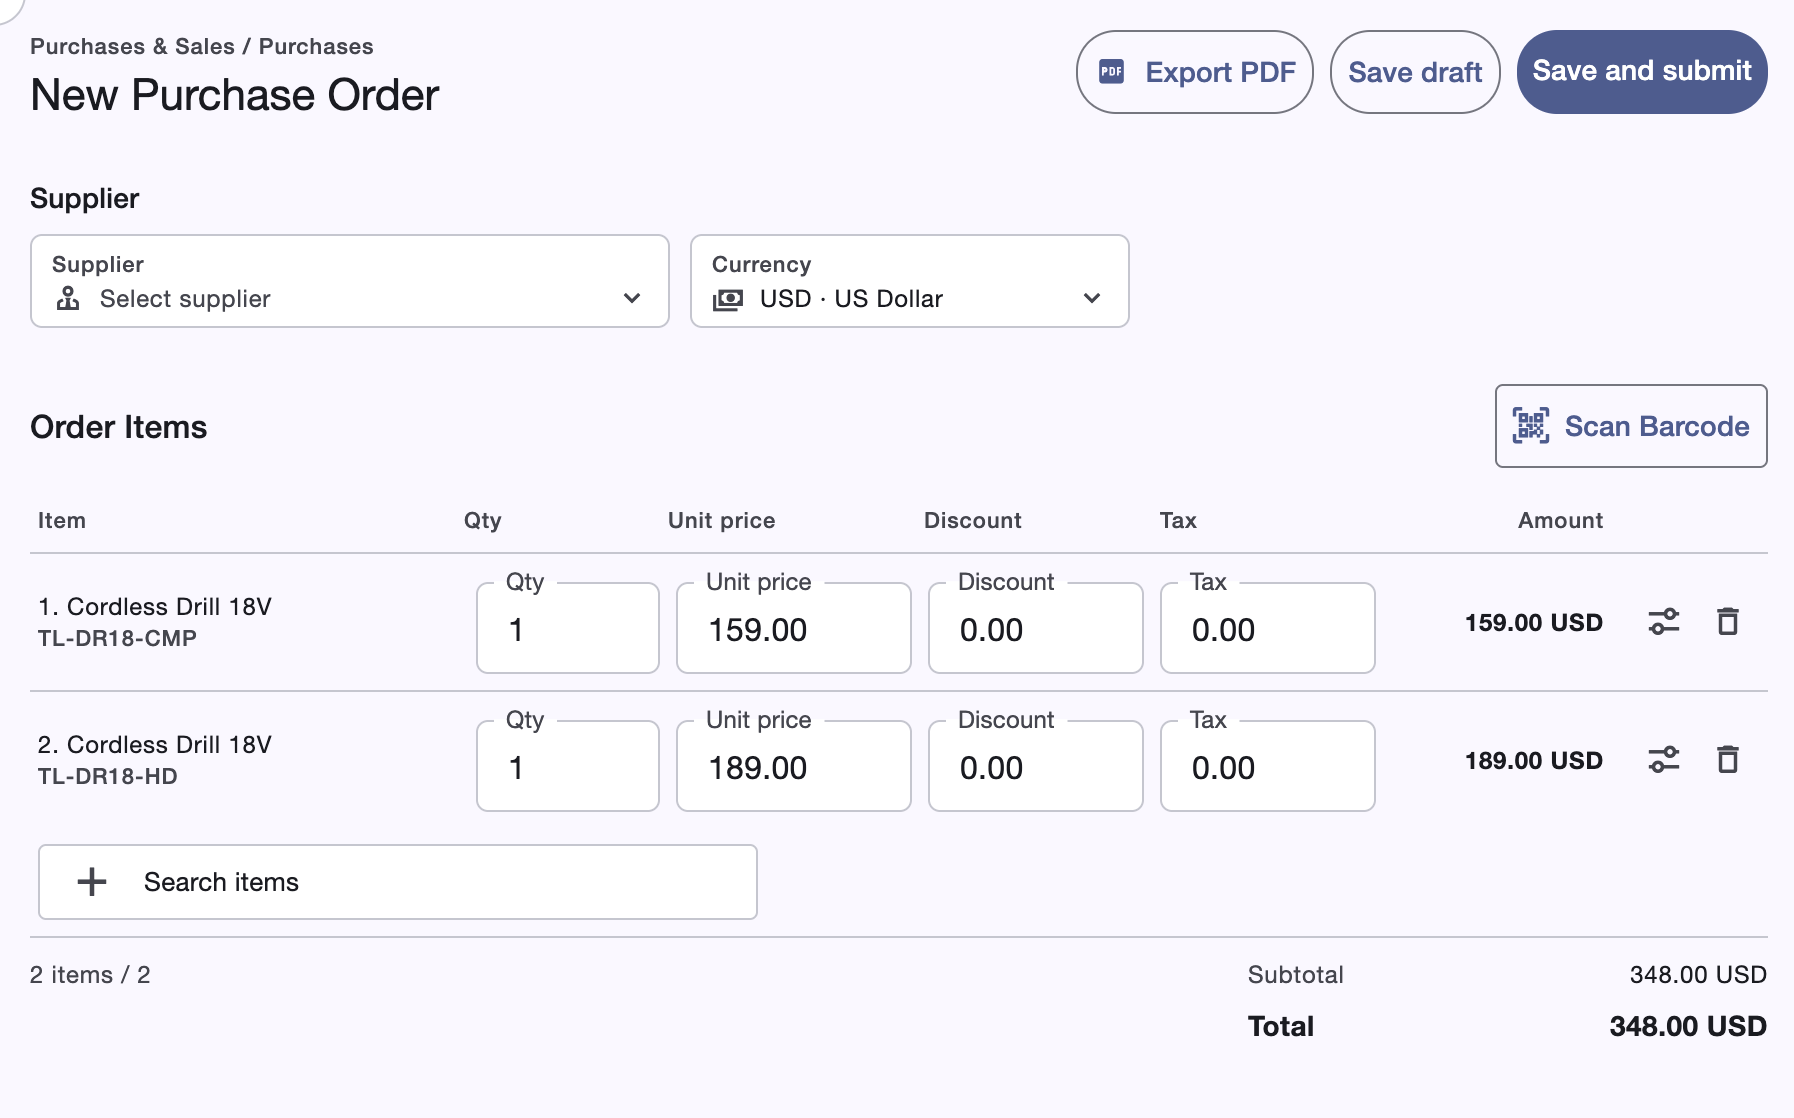
Important to know. Stock changes when a receipt is posted, not when the order is approved; accepted quantities increase inventory at their destination, while rejected quantities do not.
Lifecycle
Prepare the supplier, destinations, items, quantities, and prices.
Review the commercial details before committing the order.
Open the supplier order for one or more receipts.
Track accepted, rejected, and still-open quantities.
Note. Check each line destination before posting a receipt so accepted stock enters the intended location.
Sales Orders
A sales order tracks customer demand from approval through shipment.
Key details
- Select the client, currency, and default ship-from location.
- Add item quantities and unit sales amounts.
- Submit the order for approval, then confirm it for fulfillment.
- Post shipments in full or in part and preserve their history.
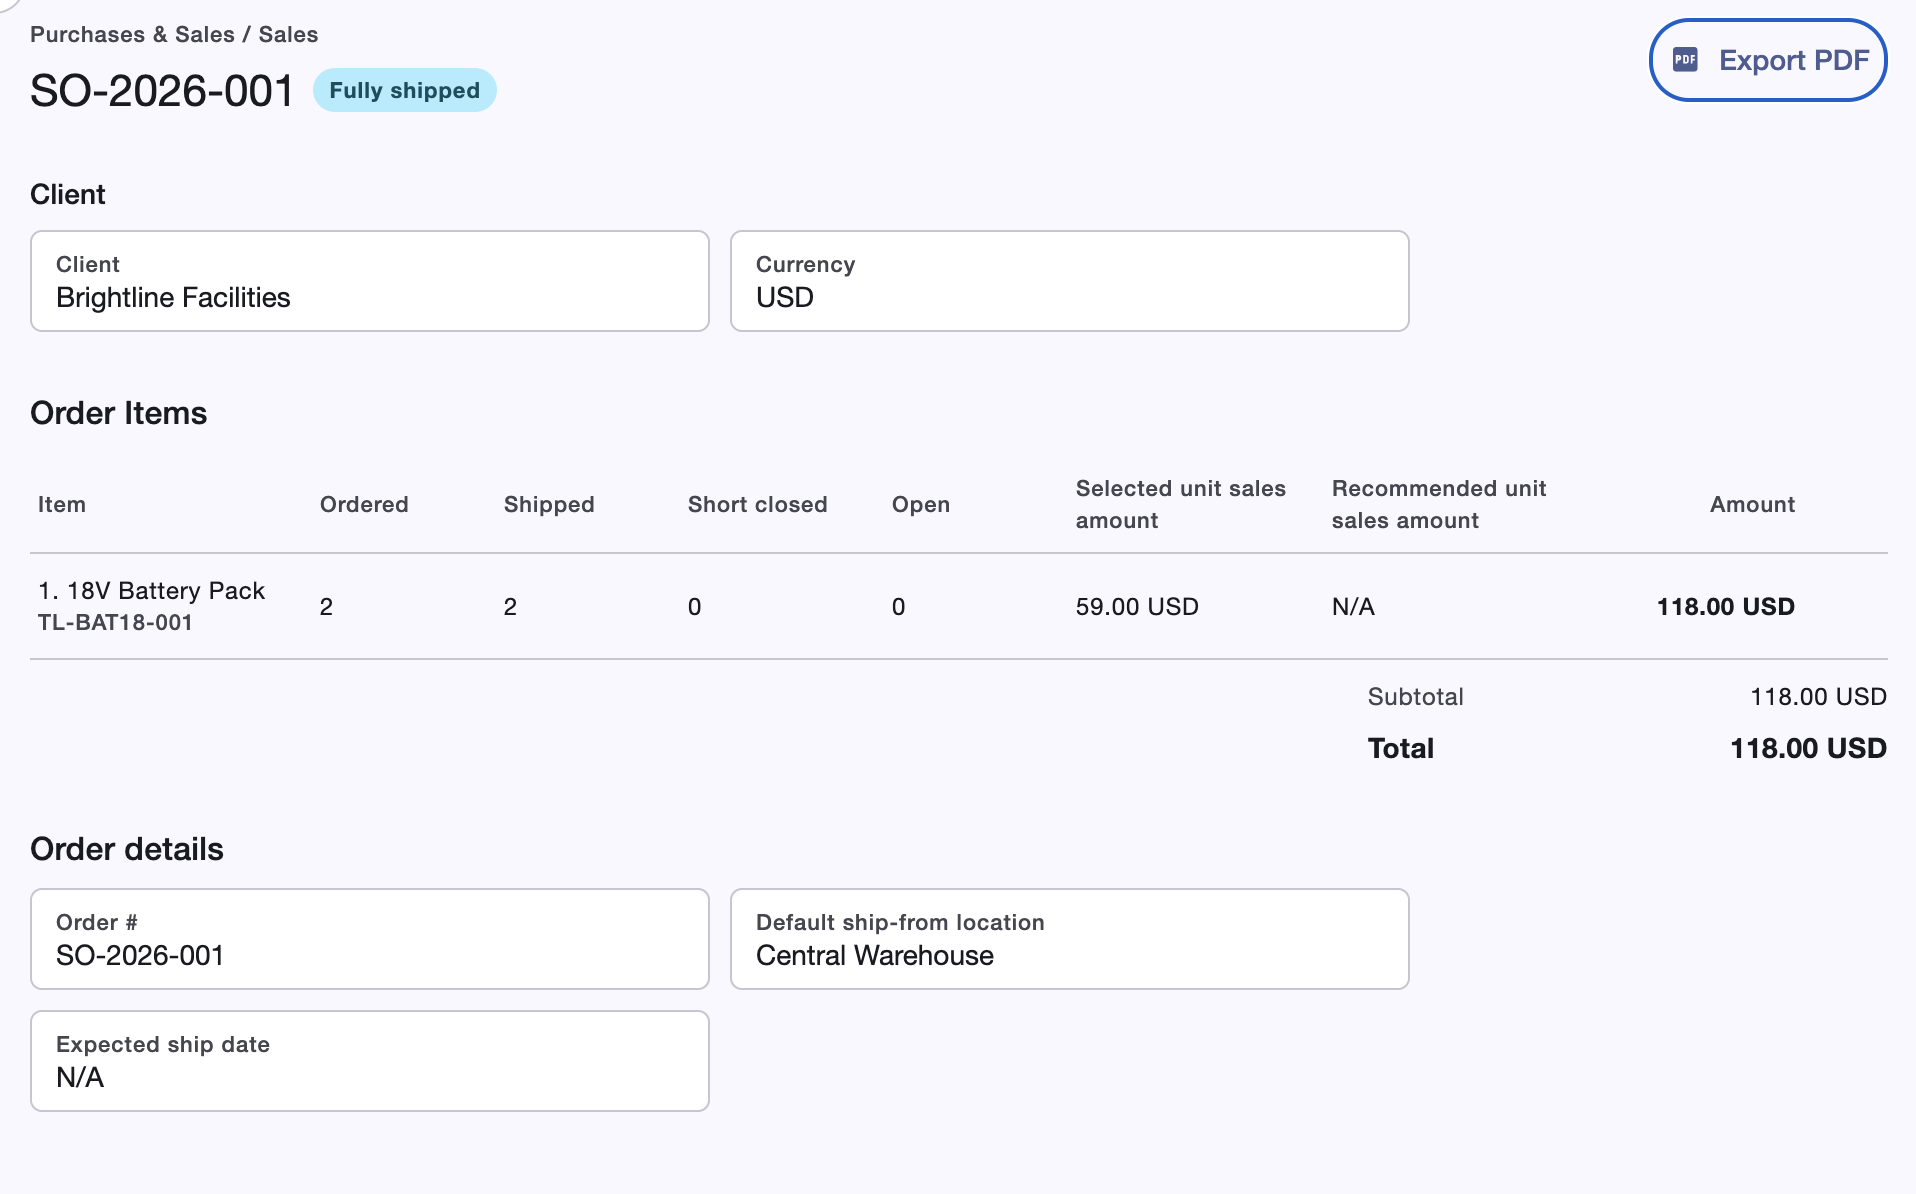
Important to know. Stock decreases when a shipment is posted, not when the order is confirmed, and each shipped quantity is deducted from its selected source location.
Lifecycle
Prepare the client, source location, items, quantities, and prices.
Review the order before committing it for fulfillment.
Make the approved demand ready to pick and ship.
Track fulfilled and still-open quantities in posted shipments.
Note. Verify the selected source location before posting each full or partial shipment.
Groups
Groups make related item records easier to browse as one product family in web search.
Key details
- Enable Show groups to combine a product family in one result.
- Review the family's combined quantity and number of locations.
- Open the group for its representative item, variants, locations, tags, and bundle members.
- Disable grouping when you need one exact item record.
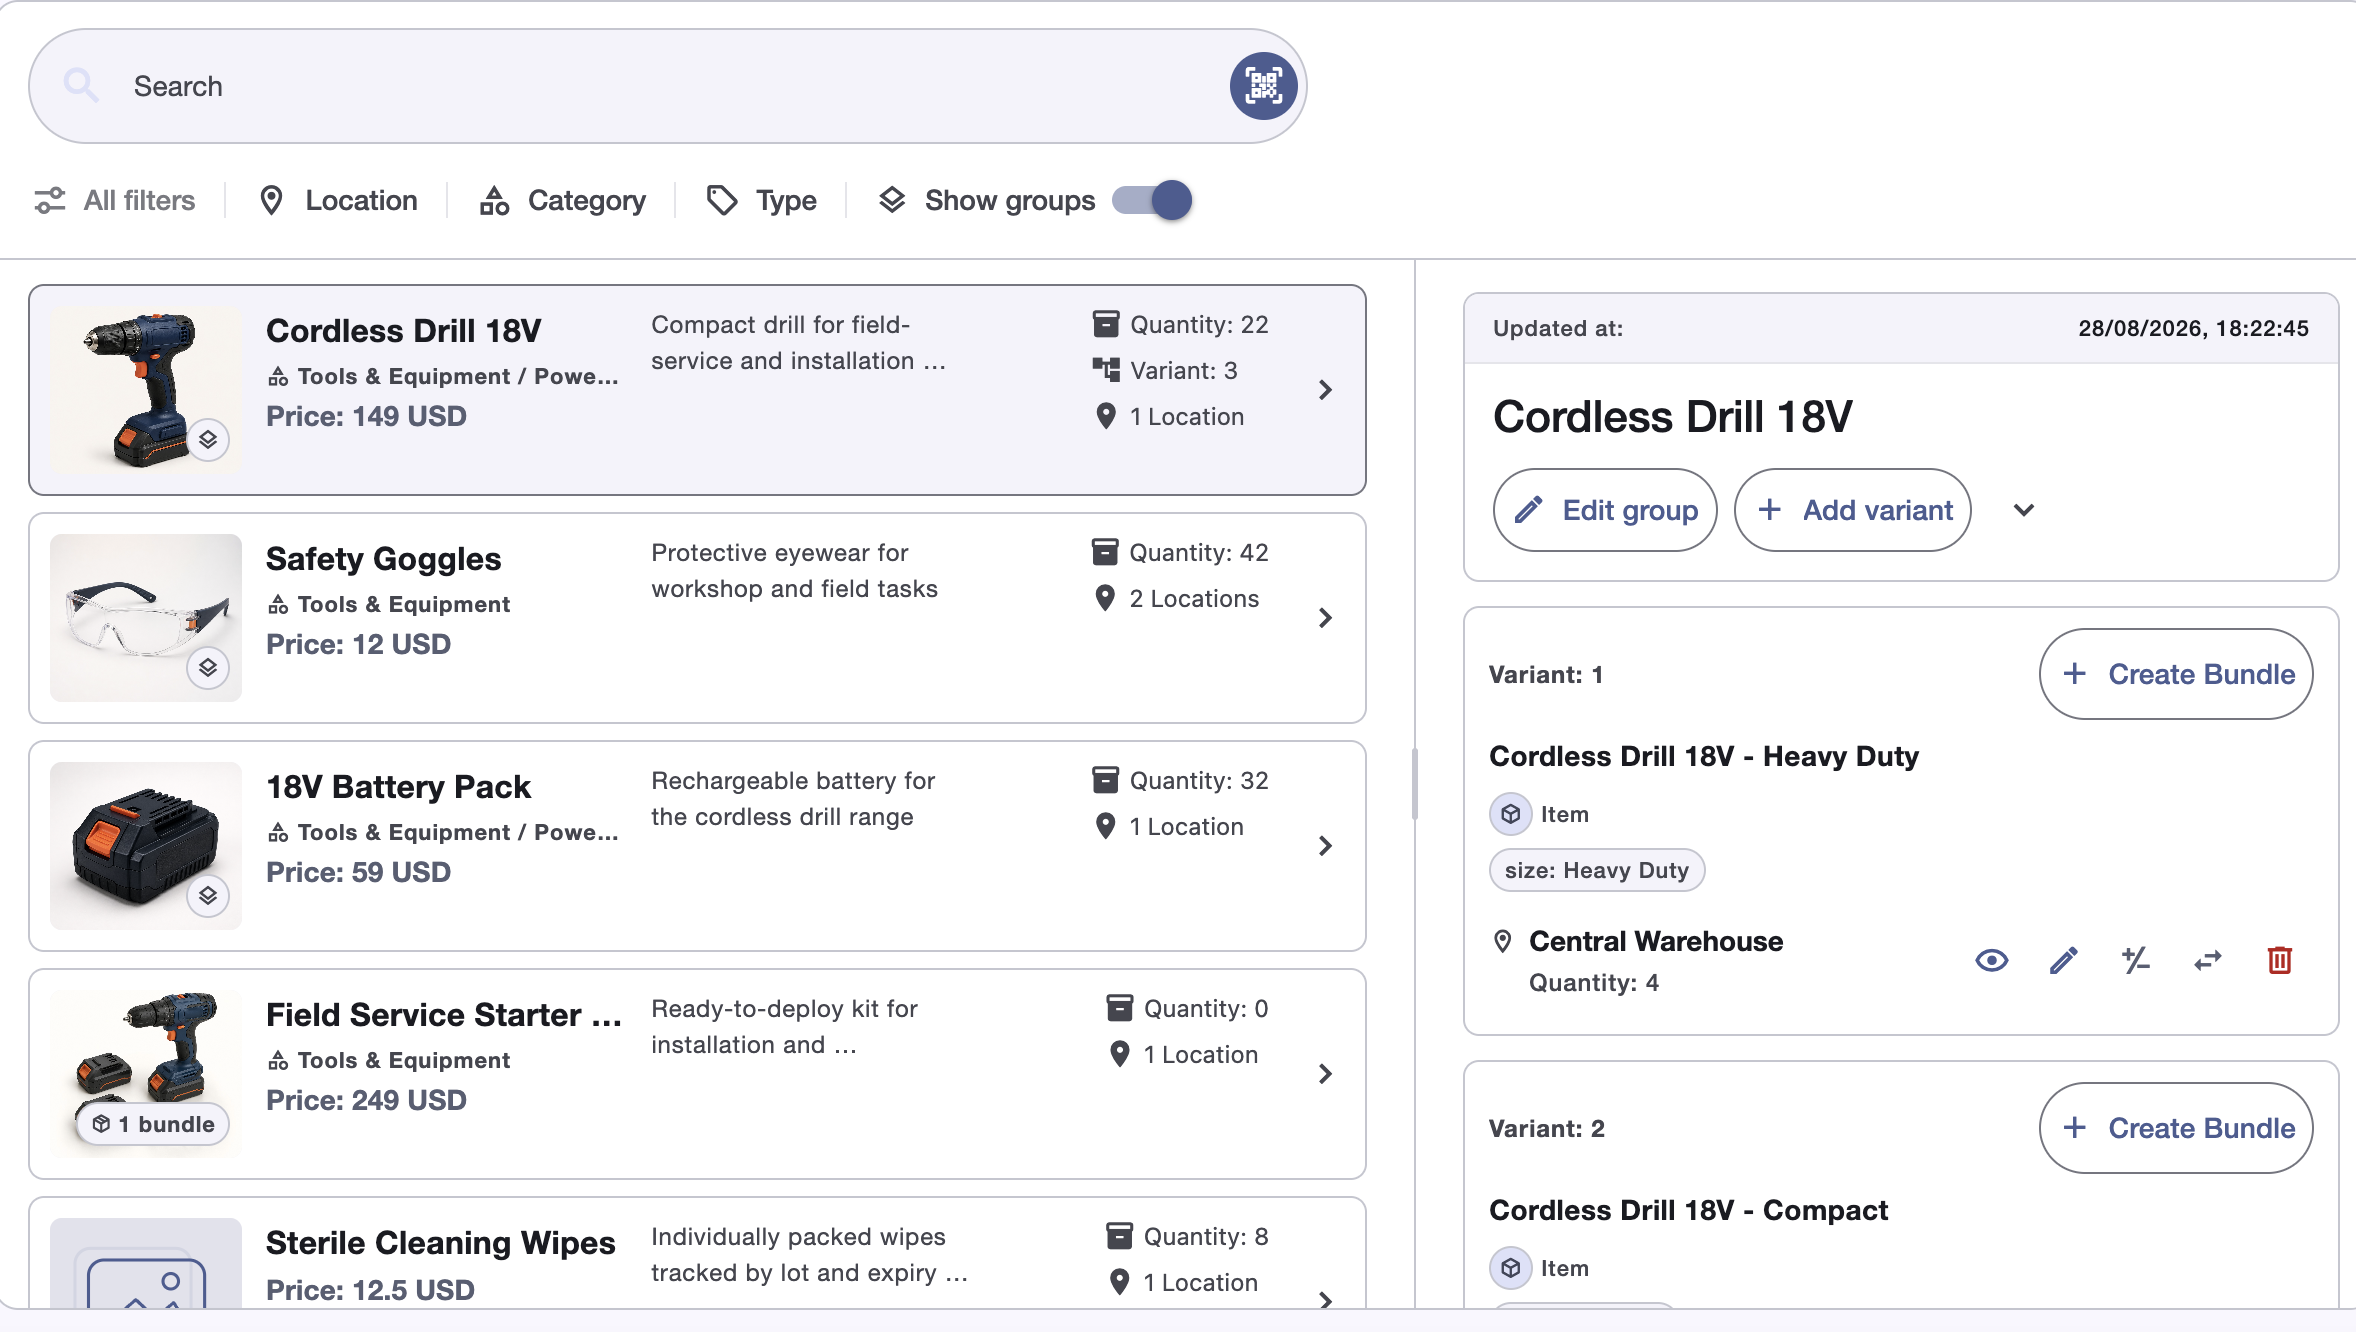
Important to know. Grouping changes the search view, not the inventory records, so every variant keeps its own SKU, code, quantities, and locations.
Note. Turn grouping off whenever you need to find or act on one exact variant.
Lots
A lot identifies a specific batch of stock so its origin, quantity, and dates can be traced separately from other units of the same item.
Key details
- Enable Lot tracking on the item family.
- Record a unique lot code, received date, and quantity.
- Add expiry tracking when lots also require expiry dates.
- Review active, depleted, and expired lots from the item record.
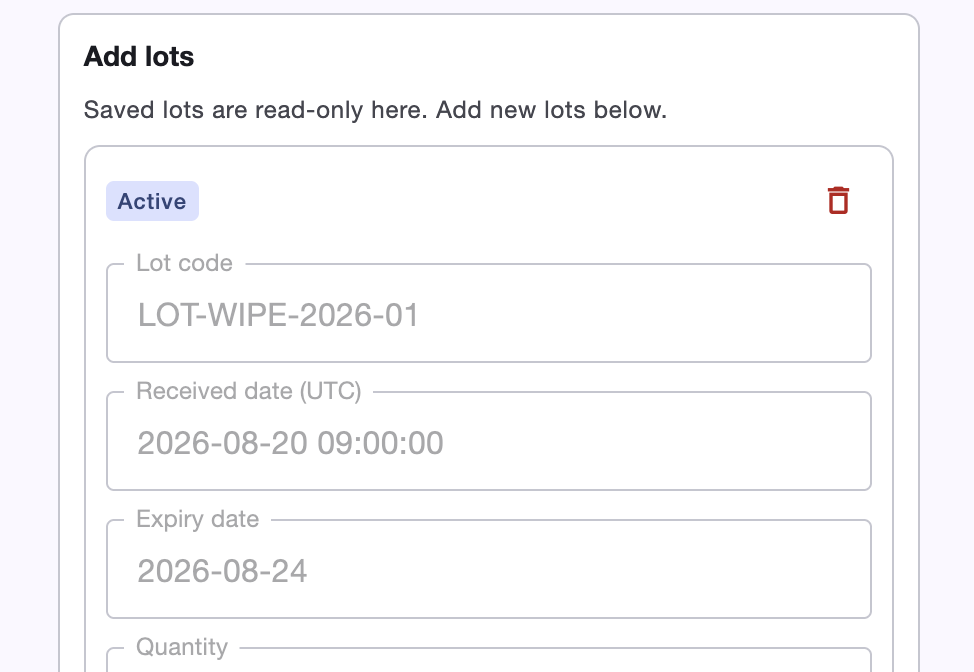
Important to know. A lot-tracked item's available total is calculated from active lot quantities instead of being edited as one unrestricted number.
Lifecycle
Create a lot for received stock or an existing batch that must be recorded.
Available lot quantity contributes to the item's total stock.
The lot remains traceable after its available quantity reaches zero.
An expiry-tracked lot remains visible after its expiry date passes.
Note. Review depleted and expired lots from the item record when tracing historical batches.
Set Up Low Stock
Set a minimum quantity and enable Low stock alert on an item's location record so Boxymi can check when that stock needs attention.
Key details
- Open the item and select the stock record for the location you want to monitor.
- Enter the minimum quantity that should be kept at that location.
- Enable the Low stock alert toggle.
- Save the item so scheduled alert reviews can compare its stock with the minimum.
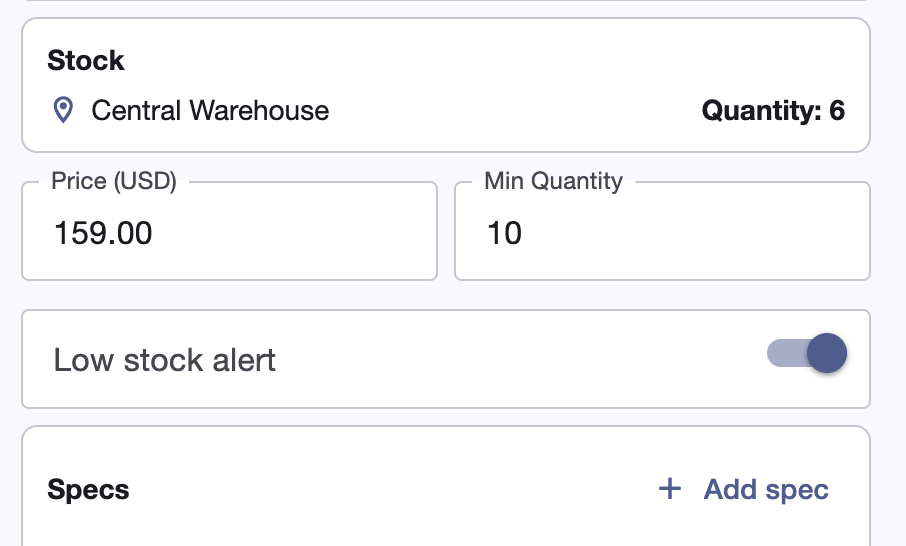
Important to know. The minimum is configured for a specific item and location. Enabling the alert does not change the current quantity.
Note. Set a minimum that gives the team enough time to replenish or transfer stock before it runs out.
Set Up Lot Expiry
Enable Lot tracking and Expiry tracking, then record an expiry date on each lot that Boxymi should monitor.
Key details
- Open the item family and enable both Lot tracking and Expiry tracking.
- Add a lot code, received date, and quantity for each batch.
- Record the expiry date that belongs to that specific lot.
- Save the item family before configuring the scheduled alert review.
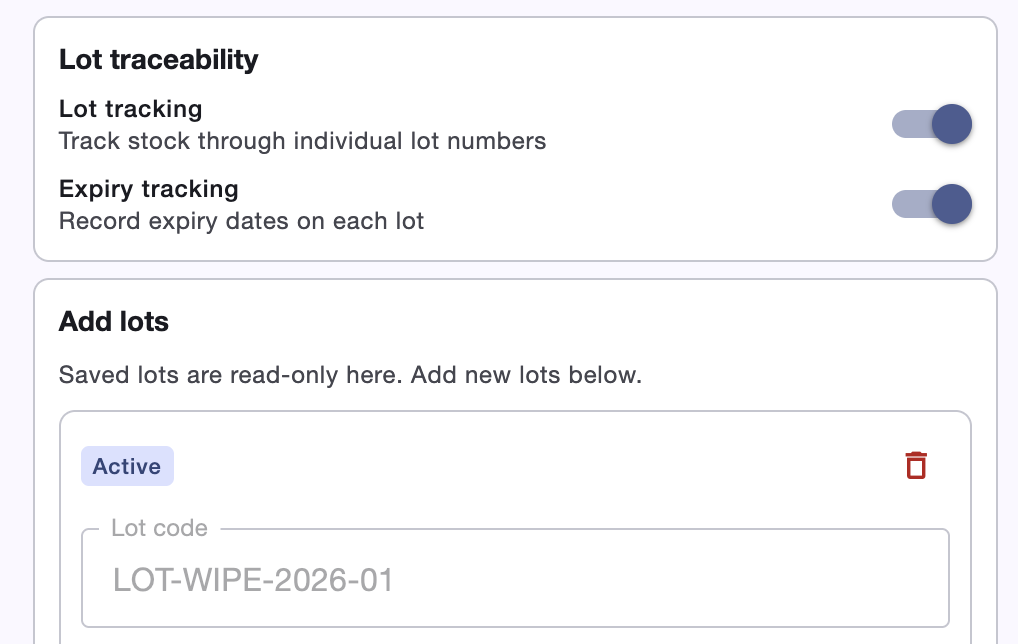
Important to know. An expiry alert can only be generated for a lot that has an expiry date. Each date belongs to its specific lot and quantity.
Setup flow
Turn on Lot tracking for the item family.
Turn on Expiry tracking so lots can store dates.
Record its code, received date, and quantity.
Save the expiry date that Boxymi should monitor.
Note. After saving the lots, configure the Lot Expiry schedule and warning thresholds in Alert Settings.
Configure Alert Settings
After enabling Low Stock or Lot Expiry on the relevant items, use Alert Settings to decide when Boxymi reviews them and who receives the results.
Key details
- Choose the Low Stock or Lot Expiry tab.
- Set the timezone and daily review times for that alert type.
- Define the warning thresholds used by Lot Expiry reviews.
- Assign users to shared root locations and control email delivery separately for each alert type.
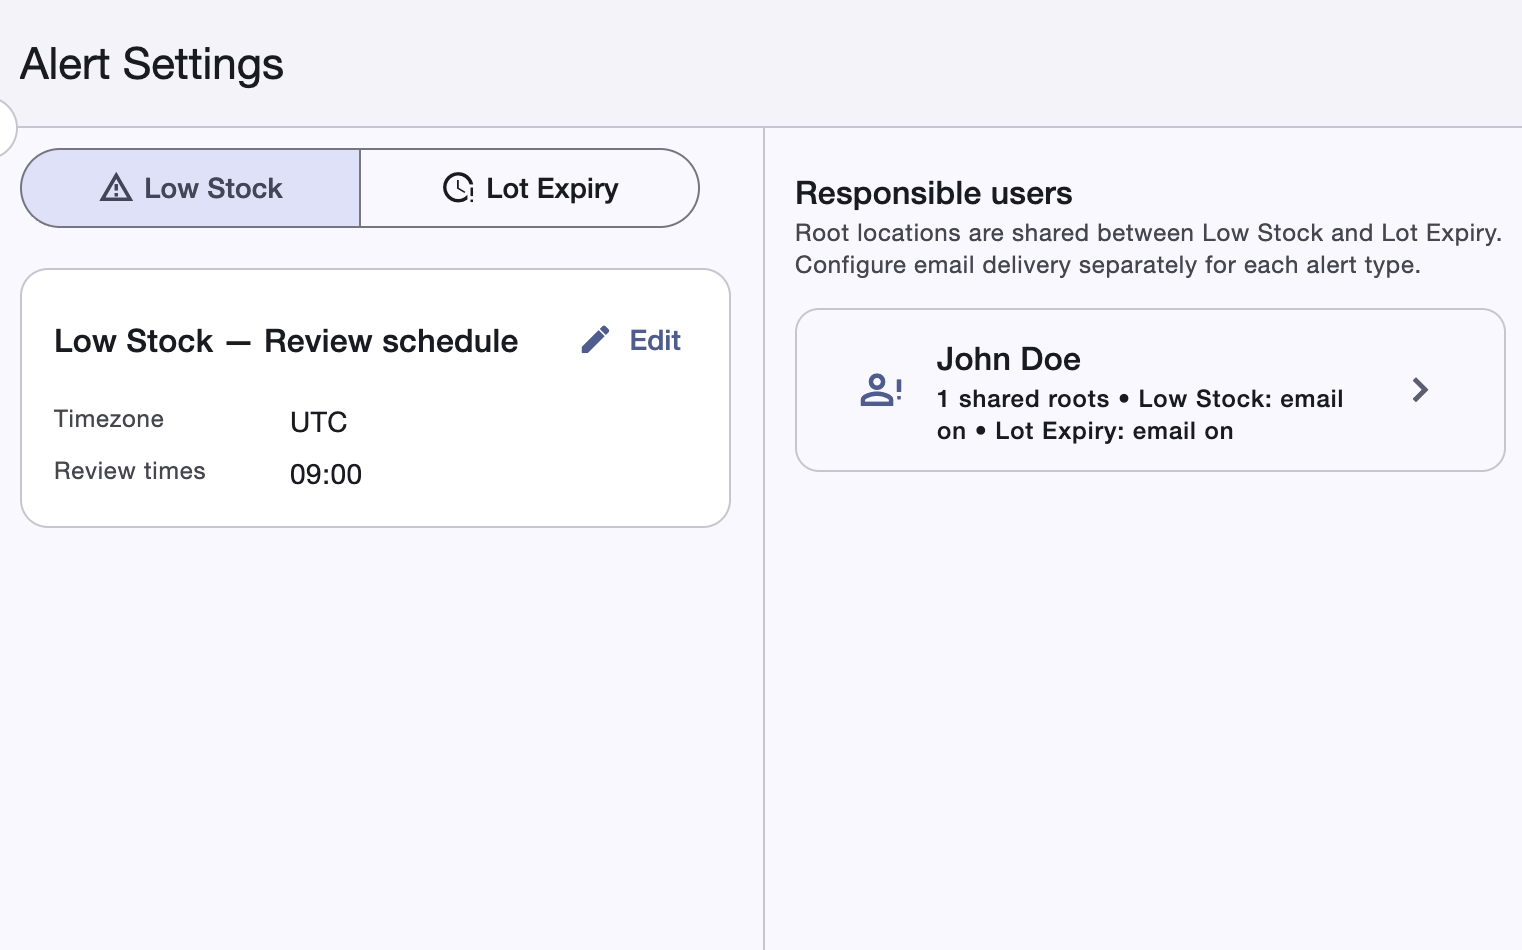
Important to know. Low Stock and Lot Expiry have separate schedules. Alert situations and email summaries are updated by these scheduled reviews, not continuously.
Note. A user's root locations apply to both alert types, while Low Stock and Lot Expiry email delivery can be switched on or off independently.
Low Stock Alert
A scheduled review creates a Low Stock Alert when an alert-enabled item's quantity at a location is below its configured minimum.
What to review
- Identify the affected item and location.
- Check the severity and whether the alert is open or acknowledged.
- Compare the quantity in stock with the minimum and the amount short.
- Act by replenishing, transferring, or correcting the stock quantity.
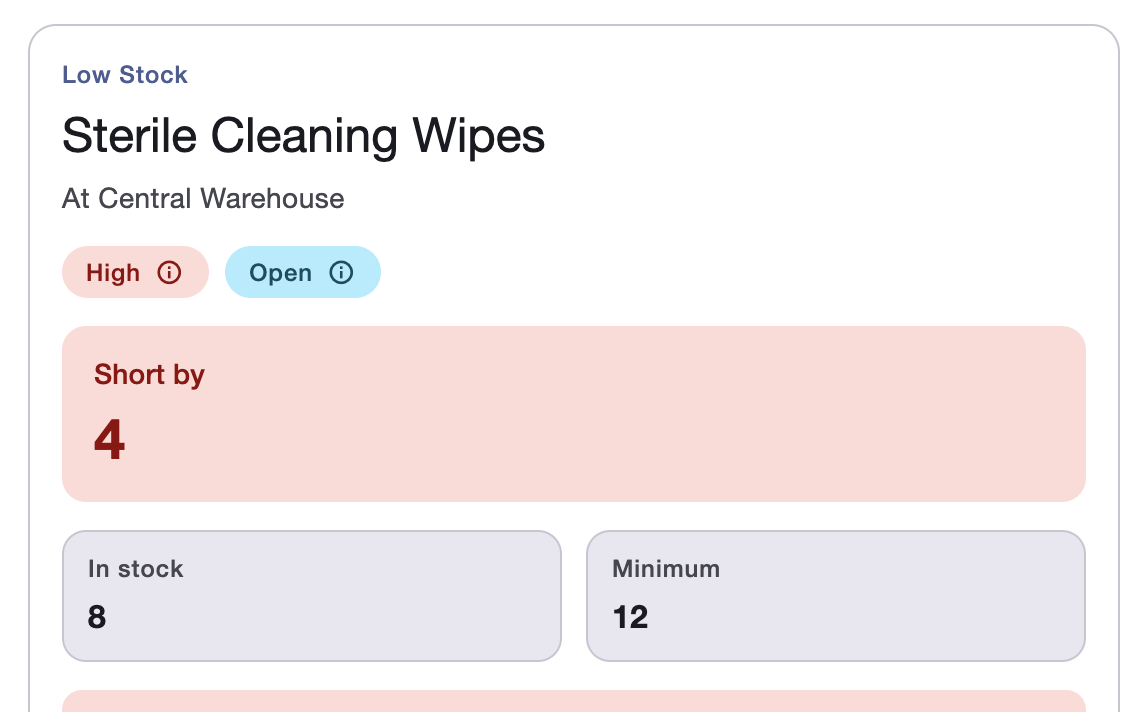
Important to know. Acknowledging an alert does not change inventory. The team must replenish, transfer, or adjust the item.
Note. The situation resolves after the stock recovers and a scheduled review evaluates it again.
Lot Expiry Alert
A scheduled review creates a Lot Expiry Alert when a tracked lot enters a configured warning window or passes its expiry date.
What to review
- Identify the affected item, lot, and location.
- Check the expiry date and whether the lot is approaching expiry or already expired.
- Use severity, status, and responsibility to prioritize the work.
- Act according to the workspace's expiry-handling process.
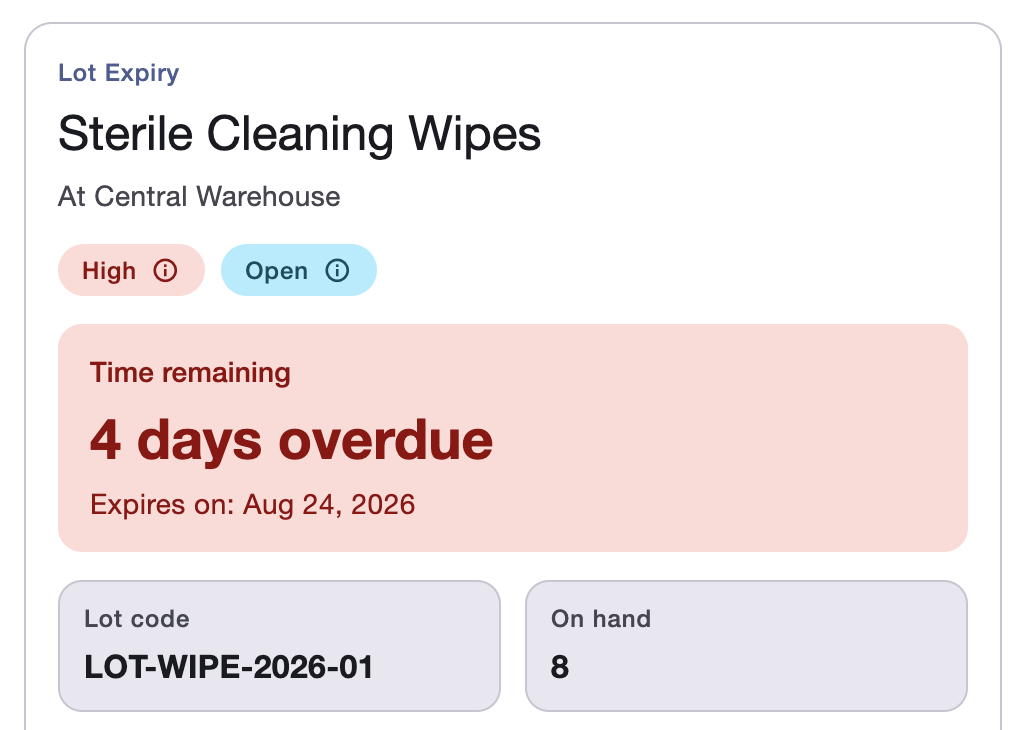
Important to know. Acknowledging an expiry alert does not change the lot, its quantity, or its expiry date.
Note. The configured warning thresholds determine how early Lot Expiry alerts appear.
Other Features
Use these supporting tools to find information, review activity, import data, and identify items quickly.
Dashboard
The dashboard is the starting point for inventory work on web and mobile.
It gives you a quick view of the active workspace and a direct path back into current inventory work.
Important to know. Dashboard information always follows the active workspace.
Key aspects
Review the main inventory and workspace statistics at a glance.
See the latest meaningful inventory changes without repeated entries.
Open useful links and return to common parts of the workspace.
Confirm the active workspace and understand the current offline state.
Note. Switch workspaces when you need to review a different inventory context.
Search
Search helps you move from an identifier or description to the right inventory record.
Search is available on web and mobile, with broader filters and navigation options on the web.
Important to know. Grouping changes only how search results are presented; it does not combine item quantities or identifiers.
How it works
Use the main search entry point or scan an identifier when supported.
Use available filters and grouping to focus on relevant items.
Select a result to review its item details and inventory context.
Use mobile for fast lookup and web for the broader result workflow.
Note. Scan on mobile for a fast lookup, then move to web when you need broader filtering or navigation.
Reports
Reports provide a focused view of inventory history.
Use the transaction report to filter stock activity and open its details, or use the cycle-count report to review completed counts and their variances.
Important to know. Reports are currently available only in the web application.
Key aspects
Filter inventory activity and open the source details behind a change.
Review completed counts, expected quantities, results, and variances.
Note. Use reports when you need a broader historical view than the operational screens provide.
Spreadsheet Imports
The web importer accepts CSV and XLSX files for adding items or reconciling existing inventory.
Choose the worksheet, map its columns, decide how rows should match existing items, and review every proposed create, update, adjustment, or skipped row before applying the import.
Important to know. The preview is the final checkpoint before the proposed inventory changes are applied.
How it works
Upload a CSV or XLSX file and select the worksheet to process.
Connect spreadsheet fields to the corresponding Boxymi item data.
Choose how each row finds an existing item or creates a new one.
Confirm every proposed create, update, adjustment, or skipped row.
Note. Resolve unexpected matches or changes in the preview before applying the import.
Scanning QR Codes, Barcodes, and SKUs
Boxymi can use QR codes, barcodes, and SKUs to identify items quickly during inventory work.
Activate an available scan field and use the device camera or a connected scanner to find an item or fill its identifier in search, item editing, adjustments, transfers, purchase orders, and cycle counts.
Important to know. A scan is only as reliable as the saved identifier, so codes must be unique wherever the workflow depends on an exact match.
Key aspects
Scan a Boxymi or external QR value to identify the matching item.
Use the device camera or a connected scanner in supported workflows.
Enter or scan a stock-keeping unit as the item's working identifier.
Find items or fill identifier fields without leaving the current task.
Note. Confirm the saved identifier when a scan does not return the expected item.
Code Generation
Code Generation is planned to create QR codes and barcodes for items directly in Boxymi.
The planned workflow will keep generated codes connected to their item records.
Important to know. This feature is not currently available.
Note. Continue using identifiers already saved to items until in-app code generation becomes available.
Barcode Printing
Barcode Printing is planned to print item barcodes and prepared labels directly from Boxymi.
The planned workflow will keep label preparation connected to the item record.
Important to know. This feature is not currently available.
Note. Use your current label-preparation method until in-app barcode printing becomes available.
Settings
Manage your account, team access, and invitations without changing the inventory model itself.
Account
Your account contains the personal information and sign-in details associated with your Boxymi access.
Account settings apply to you across every workspace you can open.
Important to know. Your account and a workspace are different, so account changes follow your user while workspace membership and roles are managed separately.
Key aspects
Review the profile and sign-in information associated with your user.
Update the personal fields available in account settings.
Sign in again when Boxymi needs to verify a sensitive action.
Review the confirmation and workspace-access impact before deletion.
Note. If a workspace is missing, ask its owner to confirm your membership instead of changing your account details.
Team and Roles
Team and roles control who can open a workspace and which actions each person can perform.
Team management is available on web and mobile for reviewing members, roles, ownership, and invited access.
Important to know. Available actions depend on each member's assigned workspace role.
Key aspects
Review the people who currently have access to the active workspace.
Define the actions available to each member with workspace roles.
Keep ownership and restricted actions with the appropriate person.
Give collaborators access without transferring ownership.
Note. If an action is unavailable, ask the workspace owner to confirm the assigned access.
Invitations
Invitations give a teammate access to the active workspace.
Users with the required workspace role can manage invitations on web and mobile.
Important to know. An invitation applies to one workspace, and accepting it does not copy or combine inventory from another workspace.
How it works
Enter the teammate's email address and choose the workspace role.
Keep the invitation separate from active membership until acceptance.
Update the invitation or role when pending access must change.
Sign in with the invited email address to accept access.
Note. Confirm the intended workspace, email address, and role before sending an invitation.
Applications
Choose the web or mobile experience for the work at hand, and understand where their capabilities differ.
Mobile App Overview
The mobile app is designed for inventory work while moving through a warehouse, stockroom, vehicle, or job site.
It keeps lookup, scanning, assigned work, and quick item changes close to the physical stock.
Important to know. Some administrative and batch workflows still require the web app.
Key aspects
Search items, scan identifiers, and open item details in context.
Complete assigned cycle counts and review alerts while moving.
Start item-level adjustments and transfers near the physical stock.
Use the guided item-creation flow available only on mobile.
Note. Use the application comparison below when a task needs broader operational controls.
Web App Overview
The web app provides the broader workspace administration and inventory operations interface.
It brings full histories, batch tools, orders, reports, imports, and advanced workspace controls together.
Important to know. Everyday item, location, search, alert, and team work is also available on mobile.
Key aspects
Use reports, full histories, batch adjustments, and transfer management.
Run purchase and sales orders with supplier and client records.
Import spreadsheets, reconcile records, and plan broader inventory work.
Manage alerts, administrative settings, and advanced operations.
Note. Move to web when a task needs more context, broader controls, or bulk actions.
Web and Mobile Feature Differences
Choose the application that matches the work, with everyday inventory tasks shared, broader operational controls on web, and guided item creation on mobile.
- Authentication and workspaces
- Dashboard and search
- Items, images, locations, categories, and tags
- Low-stock and expiry alerts
- Lot details and assigned cycle counts
- Quick item adjustments and transfers
- Team and invitation management
- Transaction and cycle-count reports
- Full adjustment history and batch adjustments
- Full transfer lifecycle
- Cycle-count planning and approval
- Purchase and sales orders
- Partner records
- Spreadsheet imports and reconciliation
- Guided item creation
Important to know. Feature availability can change as the web and mobile applications evolve.
Note. Use this comparison as the current high-level division of work between the applications.